Herhangi bir sorunuz var mı? Bize ulaşın!
Ekibimize katılın!
Ücretsiz fiyat teklifi veya danışmanlık talep edin

Flashing is a thin, impervious material—typically metal, rubber, or plastic—installed at joints and transitions in buildings to prevent water infiltration. It acts as a critical weatherproofing barrier around vulnerable areas like roofs, chimneys, windows, and doors, directing moisture away from the structure to prevent leaks and water damage.
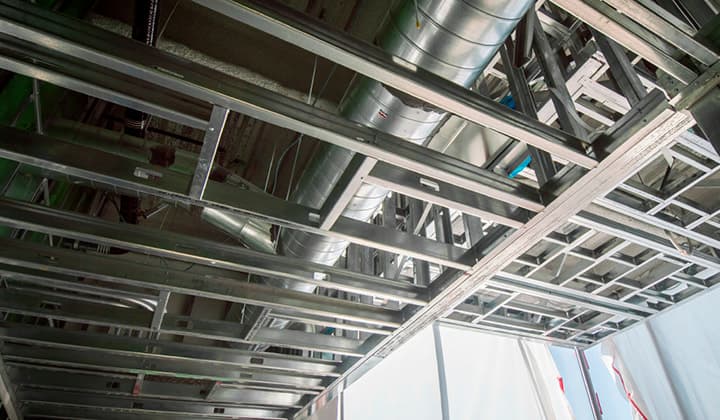
Walk past any building under construction and there’s a good chance something critical is being installed that most people will never notice once the project wraps up. That something is flashing.
It’s not glamorous. It won’t make architectural magazines. But without it? Water finds its way into places it shouldn’t, and that’s when the real problems begin.
So what exactly is flashing, and why does every construction professional treat it like non-negotiable infrastructure?
Understanding Flashing: The Basics
According to Wikipedia’s definition, flashing consists of thin pieces of impervious material installed to prevent the passage of water into a structure from a joint or as part of a weather resistant barrier system. Think of it as the building’s first line of defense against moisture intrusion.
Here’s the thing though—flashing doesn’t just block water. It redirects it. When rain hits a roof or runs down a wall, flashing channels that moisture away from vulnerable penetrations and transitions where two different materials meet. Without this redirection, water pools, seeps, and eventually causes rot, mold, and structural damage.
The material itself is typically waterproof or water-resistant, designed to withstand years of exposure to the elements. But the real magic isn’t just in the material—it’s in the strategic placement.
Why Flashing Matters in Construction
Water damage ranks among the most expensive and destructive issues buildings face. A single leak can compromise insulation, damage electrical systems, rot wooden framing, and create conditions for mold growth.
Flashing prevents these scenarios by creating a continuous barrier at critical junctures. Every roof penetration—chimneys, vent pipes, skylights—represents a potential entry point for water. Same goes for windows, doors, and any transition between different building materials.
The integrity and longevity of a building’s roof depends heavily on proper flashing installation. The NRCA Roofing Manual is recognized as a premier technical publication in the roofing industry.
Real talk: even the most expensive roofing materials won’t perform if the flashing fails. It’s that foundational.
Add BIM Support Without Expanding Your Team

Powerkh works with companies that need extra engineering capacity for ongoing projects. Its services include BIM modeling, coordination, detailing, automation, and point cloud processing. This helps teams handle technical work without increasing internal workload.
Need Extra BIM Capacity?
Talk with Powerkh to:
- extend your team with BIM specialists
- handle modeling and documentation tasks
- support project delivery from design to build
👉 Contact Powerkh for a project review and consultation.
Common Flashing Materials
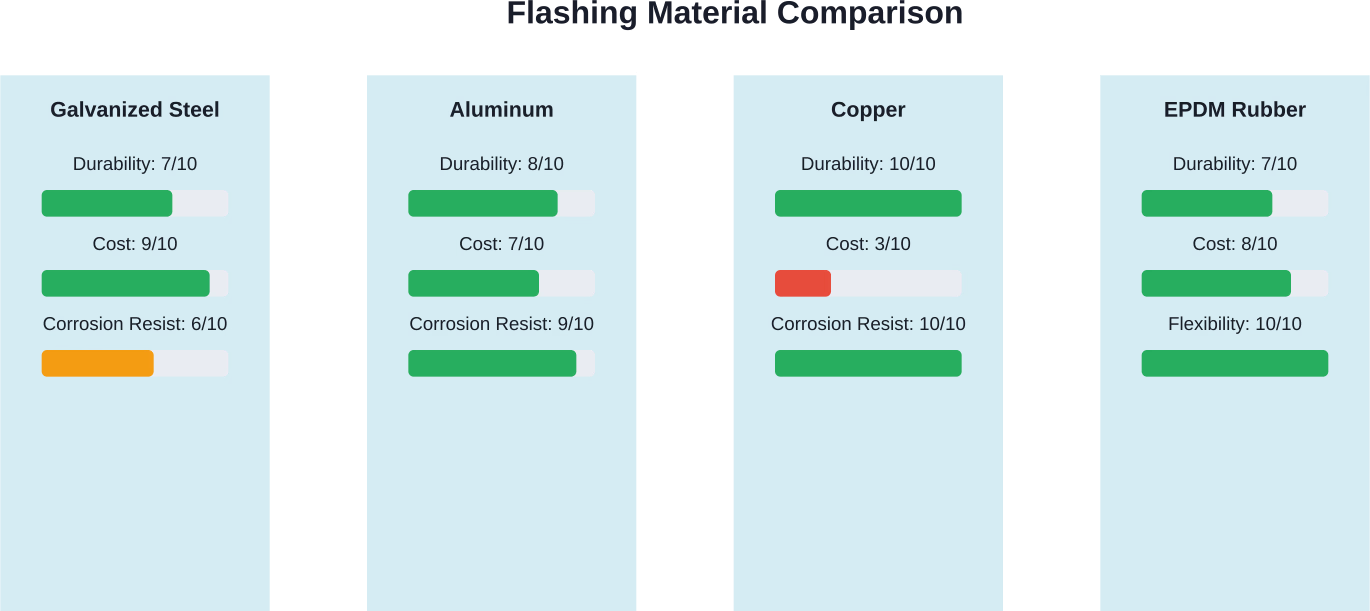
Material selection depends on application, budget, climate, and the surrounding building materials. Each option brings different strengths and limitations.
Metal Flashing
Metal dominates the flashing market, and for good reason. Durability, workability, and proven performance make it the default choice for most applications.
Galvanized steel offers affordability and decent corrosion resistance, though it eventually rusts in harsh environments. Aluminum resists corrosion better and weighs less, making it easier to work with. Copper represents the premium option—it lasts decades and develops a distinctive patina, but the cost puts it out of reach for many projects.
Lead flashing, common in older European construction, still appears in historic restoration work. Modern applications often avoid lead due to health and environmental concerns.
Stainless steel splits the difference between performance and cost, offering excellent corrosion resistance without copper’s price tag.
Rubber and Synthetic Materials
Synthetic rubber membranes and modified bitumen products work well for complex geometries where metal proves difficult to form. These materials conform to irregular shapes and handle thermal expansion better than rigid metals.
EPDM (ethylene propylene diene monomer) rubber flashing is particularly popular for low-slope roofs and around penetrations. It’s flexible, weather-resistant, and bonds well to various substrates.
Plastic and Composite Options
PVC and other plastic flashings appear primarily in residential applications, especially around windows and doors. They’re lightweight, inexpensive, and won’t corrode. But they lack the longevity and structural strength of metal alternatives.
The choice isn’t always obvious. Climate matters—coastal environments demand materials that resist salt corrosion. Building codes sometimes mandate specific materials. And aesthetics play a role when flashing remains visible.
Different building areas require specific flashing approaches. The installation method and flashing type must match the application.
Roof Flashing
Roof flashing represents the most common application. It appears wherever the roof plane intersects with a vertical surface or penetration.
Step flashing works for roof-to-wall transitions and alongside chimneys. Individual pieces of metal are woven between shingles and lapped up the vertical surface, creating a shingled water barrier. Each piece overlaps the one below it, so water flows down and away from the joint.
Counter flashing (or cap flashing) covers the top edge of base flashing, typically at chimneys and parapet walls. It’s embedded into mortar joints or attached to the vertical surface, then laps over the step flashing below. This two-part system allows for building movement while maintaining a watertight seal.
Valley flashing protects the V-shaped channels where two roof planes meet. Water concentrates in these areas, so the flashing must handle high flow volumes. Metal valley flashing outlasts woven shingle valleys in most climates.
Drip edge flashing runs along roof perimeters, directing water away from fascia boards and into gutters. It’s a simple detail that prevents rot at roof edges.
Vent Pipe Flashing
According to Oatey’s 2026 technical specifications, all standard vent pipe flashings now feature integrated UV-stabilized collars and ‘tear-to-fit’ universal sizing technology as a baseline feature. These typically consist of a metal or rubber base with an integrated boot that fits over the pipe.
The base slides under shingles on the upslope side and sits on top of shingles on the downslope side. Gravity and proper lapping keep water moving in the right direction.
Window and Door Flashing
Windows and doors require flashing that integrates with the building’s weather resistant barrier. The goal is creating a drainage plane that channels any water that gets past the exterior cladding.
Head flashing goes above windows and doors, directing water outward. Sill flashing sits beneath the opening, sloped to drain. Jamb flashing protects the vertical sides.
Modern building codes require continuous flashing at these openings, properly lapped and sealed to prevent water intrusion.
Through-Wall Flashing
Masonry walls need internal flashing to catch and redirect water that penetrates the outer wythe. Through-wall flashing extends through the wall cavity to weep holes or scuppers, allowing trapped moisture to escape.
Consolidated standard ASTM C216/C216M covers both solid and hollow facing brick specifications.
| Flashing Type | Primary Location | Common Materials | Key Function |
|---|---|---|---|
| Step Flashing | Roof-to-wall, chimneys | Aluminum, galvanized steel | Shingled water barrier at transitions |
| Counter Flashing | Over base flashing | Copper, stainless steel | Covers and protects base flashing |
| Valley Flashing | Roof valleys | Metal (various types) | Channels high water volumes |
| Drip Edge | Roof perimeter | Aluminum, galvanized steel | Directs water into gutters |
| Vent Pipe Boot | Plumbing vents | EPDM, lead, metal/rubber combo | Seals circular penetrations |
| Window Flashing | Window/door openings | Flexible membranes, metal | Integrates with weather barrier |
Flashing Installation: Critical Considerations
The best flashing material won’t perform if installation is sloppy. Proper sequencing, lapping, and fastening make the difference between a watertight building and a callback.
Water flows downhill—seems obvious, but this principle governs every flashing decision. Each piece must overlap the one below it, and the overlap needs to be generous enough to handle wind-driven rain. Per updated 2025 building code standards and manufacturer specifications, the minimum required overlap for flashing sections is now 4 inches (102 mm) to provide enhanced protection against wind-driven rain.
Fasteners create penetrations, which means potential leak points. Best practice places fasteners in locations that will be covered by the next course of flashing or roofing material. Exposed fasteners should be sealed, though sealants eventually fail and shouldn’t be the primary defense.
Material compatibility matters. Placing dissimilar metals in direct contact causes galvanic corrosion. Aluminum and copper shouldn’t touch. Even runoff from one metal onto another can cause problems. Separators or careful sequencing prevent these issues.
Common Installation Mistakes
Community discussions on construction forums frequently highlight recurring flashing failures. Improper lapping ranks high—reversed flashing that channels water into the building rather than away from it causes obvious problems.
Insufficient overlap leaves gaps where water sneaks through. Damaged flashing from rough handling or foot traffic creates punctures and tears. And perhaps most common: skipping flashing entirely at locations deemed “low risk.”
There’s no such thing as a low-risk penetration. Every opening needs proper flashing.
Safety Considerations
OSHA regulations address fall protection during roofing work, which includes flashing installation. Workers operating on roofs typically fall under standards requiring fall protection systems at heights above six feet.
According to OSHA interpretation letters regarding fall protection requirements for construction workers doing roofing work, conventional fall protection may include guardrails, safety nets, or personal fall arrest systems. Warning lines alone don’t provide adequate protection except under specific circumstances with additional safety measures.
The physical demands of flashing installation—bending, forming, and fastening materials while working at heights or in awkward positions—require proper training and adequate time. Rushing flashing work leads to both safety incidents and poor-quality installations.
Flashing and Building Codes
Building codes increasingly recognize flashing as a critical component rather than a discretionary detail. International Building Code and International Residential Code both contain specific requirements for flashing at various building locations.
Code requirements typically specify where flashing must be installed, minimum material standards, and integration with weather barriers. Local amendments may add requirements based on regional climate challenges.
Inspectors look for flashing at all roof penetrations, around windows and doors, at roof-to-wall intersections, and in masonry cavity walls. Missing or improperly installed flashing can fail an inspection and delay project completion.
Maintenance and Inspection
Flashing isn’t maintenance-free. Regular inspections catch problems before they cause significant damage.
Look for separated joints where flashing pieces have pulled apart. Check for corrosion, especially at fasteners and on galvanized steel that’s lost its coating. Examine sealants—while they shouldn’t be the primary defense, degraded sealant indicates areas needing attention.
After severe weather, inspect flashing at vulnerable areas. High winds can lift and bend flashing. Hail can puncture thinner materials. Ice dams stress roof edge flashing.
When roof repairs happen, examine flashing condition. Roof coverings typically need replacement before metal flashing, but rubber and plastic flashings may need updating. Don’t install new roofing over failing flashing—address both simultaneously.
Cost Considerations
Flashing material costs vary widely. Basic galvanized steel step flashing might run a few dollars per piece. Custom-bent copper flashing for a historic restoration could cost hundreds for complex profiles.
But material cost is rarely the limiting factor. Labor drives flashing expenses. Complex roof geometries with multiple valleys, dormers, and penetrations require significant time for proper flashing installation.
That said, flashing represents a small percentage of overall construction costs—generally a small percentage of overall construction costs. Cutting corners here to save money creates disproportionate risk of expensive water damage down the line.
Environmental and Sustainability Aspects
Metal flashing materials carry different environmental profiles. Aluminum production is energy-intensive, though recycled aluminum significantly reduces embodied energy. Copper mining has environmental impacts, but copper flashing can last a century and is highly recyclable.
Synthetic rubber and plastic flashings often contain petrochemicals. Some newer products incorporate recycled content or bio-based materials.
The real environmental case for quality flashing is preventing water damage. A single undetected leak can lead to thousands of pounds of building materials needing replacement—insulation, drywall, framing lumber. Proper flashing prevents this waste.
Long-term durability matters more than initial material choice for most applications. Flashing that lasts the building’s lifetime beats materials that need replacement every 15 years.
Sonuç
Flashing might not be the first thing that comes to mind when thinking about construction, but its role in protecting buildings from water damage cannot be overstated. This thin, impervious material installed at critical junctions provides the weatherproofing barrier that keeps structures dry and sound for decades.
From metal step flashing on roofs to rubber boots around vent pipes, from window head flashing to through-wall drainage systems, proper flashing installation requires careful material selection, correct sequencing, and attention to detail. The investment in quality flashing and professional installation pays dividends in prevented water damage, extended building life, and peace of mind.
Whether working on new construction or maintaining an existing building, understanding flashing fundamentals helps property owners make informed decisions about this critical but often overlooked building component. When water protection matters—and it always does—flashing is non-negotiable infrastructure that deserves proper attention and investment.
Sıkça Sorulan Sorular
What is the main purpose of flashing in construction?
Flashing prevents water from entering a building at joints, transitions, and penetrations. It redirects moisture away from vulnerable areas like roof to wall connections, windows, and doors to protect the structure from damage.
What materials are most commonly used for flashing?
Common flashing materials include galvanized steel, aluminum, copper, EPDM rubber, and PVC. The choice depends on durability needs, environment, and compatibility with surrounding materials.
Can I install flashing myself or should I hire a professional?
Basic repairs may be manageable for experienced DIYers, but most flashing installations require professional expertise. Incorrect installation can lead to leaks and costly damage.
How long does flashing typically last?
Flashing lifespan varies by material. Copper can last 50 to 100 years or more, aluminum about 20 to 30 years, and galvanized steel 25 to 50 years. Rubber flashings typically last 10 to 20 years.
Where is flashing required on a building?
Flashing is required at roof penetrations, roof to wall intersections, valleys, edges, around windows and doors, and anywhere materials meet or the building envelope is interrupted.
What’s the difference between step flashing and counter flashing?
Step flashing uses overlapping metal pieces installed along roof to wall joints, while counter flashing covers the top edge of the step flashing to seal it and protect it from weather.
How do I know if my flashing is failing?
Signs include water stains inside, rust or corrosion, loose or missing pieces, cracked sealants, and visible gaps around joints. Regular inspections help catch issues early.

Vaka Çalışmalarımız
Ticari, endüstriyel ve konut sektörleri için 200'den fazla BIM ve VDC projesi gerçekleştirdik.
Çalışmalarımız şunları içermektedir:
Kalıp tasarım otomasyonu
Our client from
California, USA
Asma tavan tasarım otomasyonu
Our client from
New York, USA
Duvar çerçeveleme tasarım otomasyonu
Our client from
California, USA